I wanted something for the front. I did all that work back in June to
repaint the front steps. Halloween is the perfect holiday to accentuate that paint job. I came up with the idea to put spiders on pumpkins. Here's the step by step to making them.
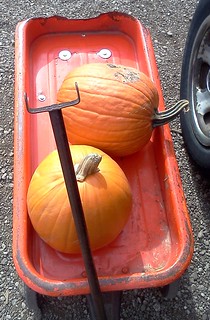
It goes without saying that you need a pumpkins. Last year, I went to
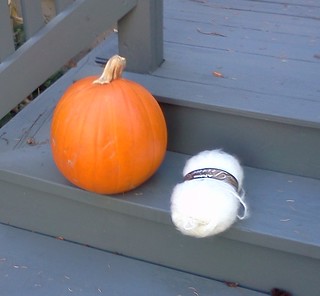
Goberts, which is northwest of me, about a 45 minute drive. I had a good time, got some great stuff, but I didn't want to drive as far this year. South of me, Johannsen's has a smaller pumpkin farm with not as much selection but just what I needed. I wanted two pumpkins, one for each side of the front, not too big that lugging them around would be difficult. I would have liked a white pumpkin, but they just had orange. There were, however, various shades of orange. The pumpkins also had to have decent stems. These two were 13 and 14 pounds.

Next step was to get the pieces to make the spiders. That meant a trip to JoAnn fabrics. Thanks to being on their "preferred customer" list, I had a coupon for 20% off my order. There are two sizes of styrofoam balls, black "chenille" sticks (I call 'em pipe cleaners.), white fuzzy yarn to make the web, googly eyes and a small can of black spray paint. I could have sworn I had a package of googly eyes but I couldn't find it. Not shown: toothpicks and glue. A complete supply list is at the end.
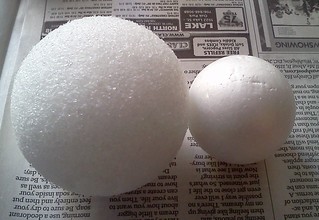
First thing to do is cover the work surface with newspaper. Next, you'll need a small and a large styrofoam ball. The large size is the body and the small size is the head. I chose a more polished ball for the head.
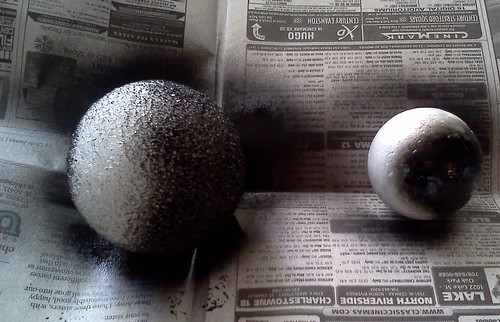
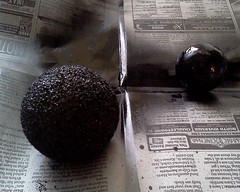
Now, you'll need to spray paint both balls black. Normally, I do this outside, but there was a breeze today which would have made spray painting very inexact and you want the balls to be as black as you can make them. I formed a small "cave", if you will, by folding over the newspaper and proceeded to spray in small bursts.
The force of the spray paint would move the ball around so I could get most of the sides just spraying in bursts. I took a toothpick and used that to manipulate the balls so I could assure a somewhat even coverage. I like how, in the photo above, the smaller ball looks like a quarter moon complete with meteor craters.
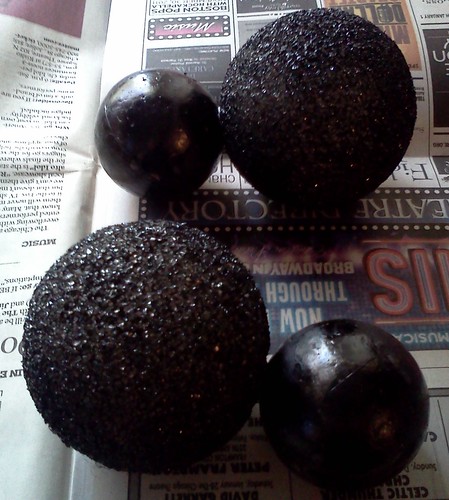
Once you get an even coverage, or as even as pleases you, you need to let these dry. I let them dry for 90 minutes. If you are using the smooth surface ball, you'll know when it's dry because it will go from a shiny sheen to a flat sheen. That doesn't take 90 minutes. The reason you wait that long is because the other ball, with its nooks and crannies, has small puddles of black paint in those nooks. You want the total surface to be as dry as possible because you're going to be holding the ball and you don't want paint on your hands. While you're waiting, take a toothpick and stick it into the middle of one "side" of a small ball.

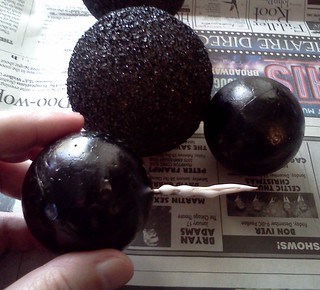
When the balls are dry, you're ready to build a spider. Take a small ball and, if you haven't stuck the toothpick into the middle, do so now. It shouldn't go all the way through, just in about 3/4ths of an inch. Spread some good old white glue onto the section of toothpick that sticks out and shove that into the middle of one of the larger balls. There you have the spider's body. The glue, when it dries, won't be visible and this helps ensure the spider won't come apart. Here are the finished bodies all ready for legs.
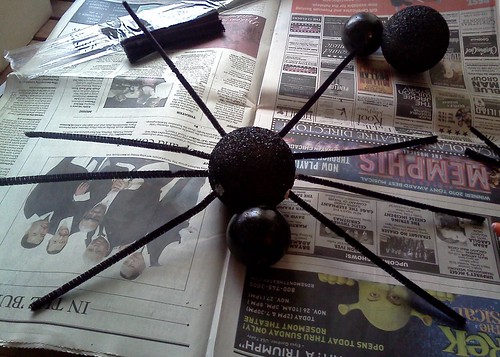
Now, take one body and 8 pipe cleaners. Remember, spiders have 8 legs. Many cartoons and even some decorations show them with 6. Insects have 6 legs. Spiders have 8. Spiders are not insects.
Take one pipe cleaner, cover one end about 1/2 inch worth with glue and stick it into the large body. Remember, you're putting 4 on each side so you'll need to eyeball where on the body you want the legs to go. Here's where I had to make an adjustment.
The out-of-the package size of pipe cleaner was too long, even for a pseudo daddy longlegs. I wound up cutting about 4 inches off the end of the leg. You'll have to decide if the length of the chenille sticks are too long or just right. If I'd used larger styrofoam balls, I probably wouldn't have had to trim, as they would have been more relevant to body size.
Once I determined the length of my legs, I trimmed enough for both spiders. I didn't realize these sticks came in a variety of colors, either. I was expecting to have to spray paint them too, which would have added more time to the project. At JoAnn Fabrics, they are located next to the styrofoam balls, which made them very easy to find. I think there were 6 different colors.
Put glue on the end of each stick and shove it into the styrofoam body. The sticks probably don't need the glue, but this will help keep them anchored in the body. When you're done with that, it does look like a spider.
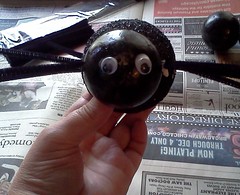
Last step is to give it a wee bit of personality. Take a couple of googly eyes and glue them onto the smooth ball. In actuality, where my spiders are positioned, you can't see the eyes, but you might put yours somewhere else and the eyes add a nice touch.
Here's where using the smooth ball is good. With the usual styrofoam ball, it's got all those nooks and crannies. That, when spray painted, looks a bit like hair and most spiders have some hair on their bodies. Trying to put enough glue on one of those balls to make the eyes stick would have been frustrating. A drop on each of the eyes and they stuck nicely to the smooth surface ball. For additional personality, depending upon where your spider is going, you could add a grin or fangs. Just draw them on white paper, cut them out, and glue to complete the face.
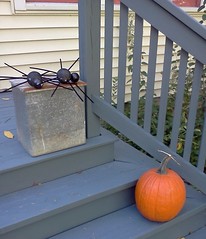
Now we're going to take our finished spiders outside. First step there was to decide where to put the pumpkins. Here's the north side of the front steps.
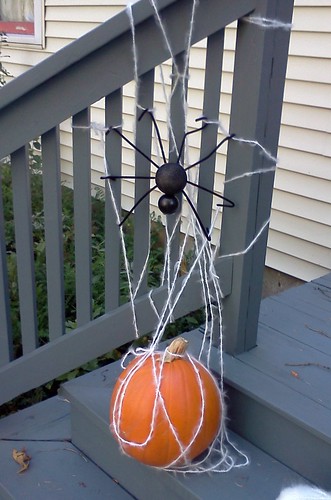
And here's the south side of the steps. Take your yarn or string, if that's what you'd like to use, and start webbing your pumpkin. I wound up cutting hunks of yarn instead of trying to stuff the skein through the slats of the railings. You'll want to drape the yarn around the pumpkin. I selected a yarn that had a fuzzy design to it. I thought it looked more 'spider-ish' than a straight yarn. I had, originally, wanted a very heavy weight yarn, but the JoAnn where I went didn't have anything like that.
I tied the yarn to the slats of the railing and just did some freestyle weaving down, around, over and back up to the railing. The yarn wouldn't stay on the pumpkin very well so I wound up taking a push pin, sticking it through several strands of yarn and then pushing it into the stem of the pumpkin. Once anchored, the yarn sort of stayed put. Here's the south side completely done.
When I had what I felt was enough "webbing", I took a spider and put her where I thought she looked the best. The sticks (legs) are bent and anchored to the webbing. If you have several web strands tied to your porch, those are the best place to anchor 3-4 of her legs. She moves with the webbing so when the wind blew, she stayed on the web and didn't blow off. I repeated the process for the north side of the front.
Spiders are much better than I'll ever be at spinning uniform webs, but it came out okay. You can see that my googly eyes don't show unless you're looking at the spider from the perspective of the pumpkin.
I have no idea how this will hold up in a rain or a stiff wind so we'll see. I'll just need to watch this the rest of the month and see how it handles the weather.
If I have to make more spiders, I think I'll change the location of the smaller ball in relation to the larger ball. If it's placed at an angle, then the googly eyes would show. If you wanted, you could stick the free end of the legs into the pumpkin and have your spider on the pumpkin. Here's the effect on the front.
It's just enough decoration for me. After Halloween, I have plans for those pumpkins. These are not the pie kind. We'll see how soggy they are on November 1st.
I hope you found this interesting and if someone tries this, I'd love to see your photos of the finished product. Happy decorating.
Supply list: pumpkins
1 package large styrofoam balls - rough finish
1 package small styrofoam balls - smooth finish
1 package black chenille sticks
1 package googly eyes
1 small can black spray paint
1 skein white fuzzy yarn
2 push pins
toothpicks
Elmer's All-purpose glue
Newspaper to cover the work surface
Beverage: Dr Pepper
Deb


No comments:
Post a Comment